-
Getting started with Aico
- Logging into Aico for the First Time
- Creating your first journal
- Creating your first request
- Creating your first payment
- Creating your first Intercompany Invoice
- Working with Closing Tasks
-
Working with Journals
- An overview of Aico journals
- How to create a manual journal
- Create a journal by copying existing journals
- Import new journals from Excel
- How to import multiple journals from one Excel spreadsheet
- What are recurring journal entries?
- How to create Recurring Duplicate Journal entries
- How to create Recurring Allocation journal entries
- Create recurring journals with automatic reversals
- Reversing documents
- Import data to existing journals
- Working with Reconciliations
- Universal Settings
- Dashboards
- Closing Tasks
-
System Manager
-
Users and User Groups
- Overview of Users and User Groups
- Add user accounts
- Edit user account data
- Manage user groups
- Manage user roles
- Copying roles at the company level
- Copy user roles from individual users
- Create a user report
- Manage administrative user rights
- Super user mode
- Additional super user global admin rights
- User and User group export and import
- Value sets
- Currency Amount Groups
- Mail notifications
- Tax codes
- Maintenance
- Periods
- Companies
- Archiving
- Managing PDFs
-
Users and User Groups
-
Automation Manager
- Introducing Automation Manager
- Core Set Up
-
Task Templates
- Introducing task templates
- Creating task template details
- The Aico Document
- Aico document headers
- Preparer and Approver workflow settings
- Overriding parameters at a company level
- Master data export and import
- Set a custom schedule
- Dependent tasks in Aico
- How to use Smart tags in Aico
- How to add an attachment to a task template
- How to create a preparer start time
- Cross company dependent tasks
- Related link types
- Task Generation
- Companies
- Administrative tasks
- Staging API
-
Aico Announcements
-
Announcements
- Public holiday dates 2025: Aico Support Unavailable.
- NEW: Journal Entry Automation Deep Dive
- Aico Skills Lab: Journal Entry Configurations Tricks & Tips (Rescheduled)
- NEW: Aico Skills Lab Tips & tricks for Aico Journal Entries configuration
- NEW: Account Reconciliation Skills Lab Exclusively for Super Users!
- Public holiday dates 2024: Aico Support Unavailable.
- NEW: Software Release Presentation: Enhancing User Experience 24.1
- Public holiday dates 2023: Aico Support Unavailable.
- Release notes
- Maintenance Schedule
- Support Alerts
-
Announcements
- Aico Reviews
Defining time and frequency settings for schedule groups
Modified on Wed, 3 May, 2023 at 12:02 PM
After setting up schedule groups and timetables, you will need to open a timetable and set the time and frequency settings for each schedule group. This article will show you how.
Define time and frequency settings
Define time and frequency settings
It is possible to have different time settings for the same schedule group in different timetables. This allows you to use a single schedule group for a task, such as monthly reconciliations. These can then be varied for different companies in different time zones as required.
To define time and recurrence settings, follow the steps below:
Select Manage (1), then Timetables (2) on the toolbar.

You will be presented with a list of your existing timetables, as shown in the example below.

Click the timetable you want to add or edit.

Add or edit a schedule
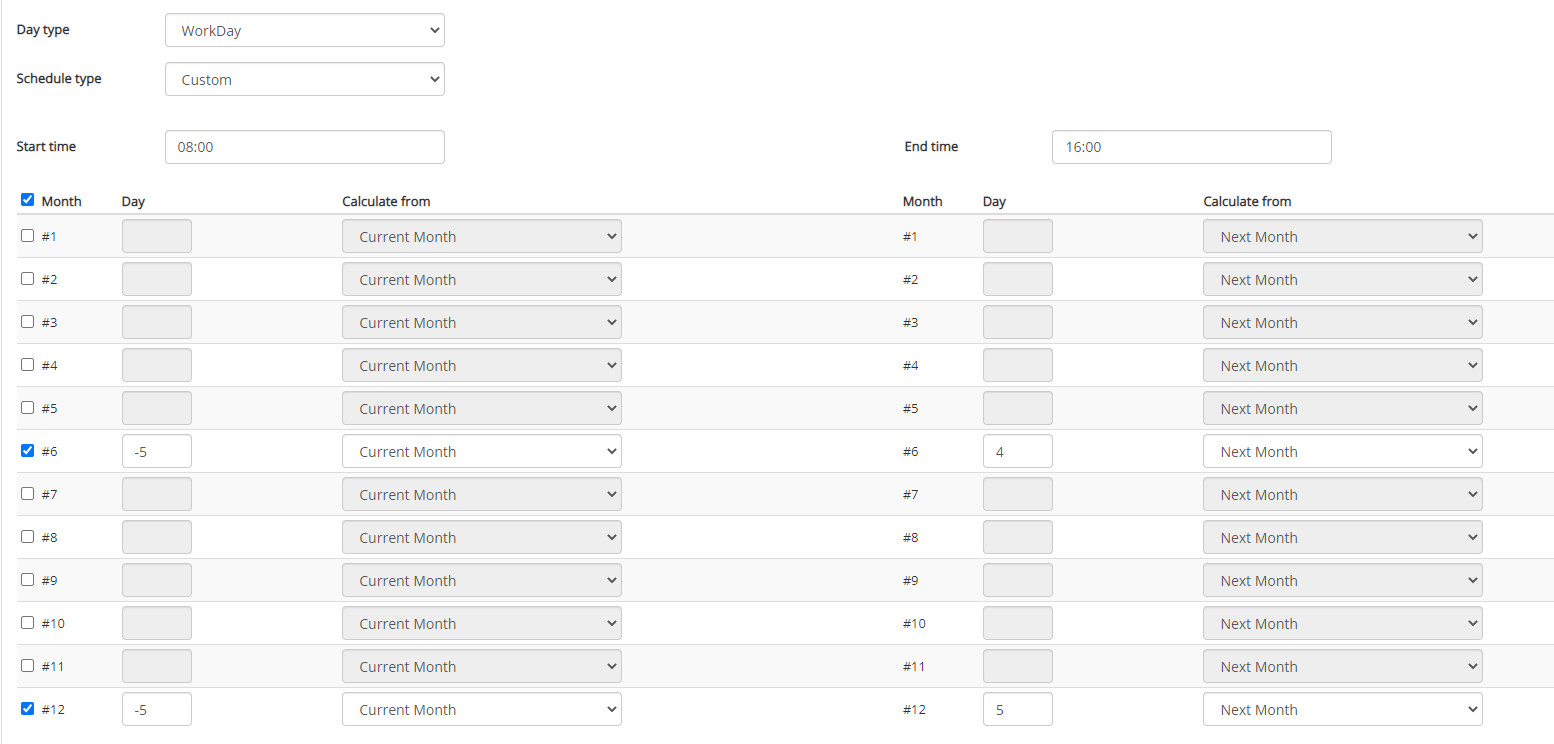
To add or edit a schedule for a schedule group you need to define the following settings:
1. In the Day type field, enter the calendar day or work day.
2. From the Schedule type drop-down list, select monthly, quarterly or custom. Custom means that you can choose which months the task should run in as well as vary the start and end date in each month.
3. In the Start time field enter the time of day when the task starts (for example 08:00). In the End Time field, enter the time of the day when the task ends.
4. Enter a day number in the Day column. Note that negative values are also allowed. For example, day -5 of the current month is 5 work days before the end of the month you are closing. Correspondingly, day 2 of next month is the second work day of the following month.
5. From the Calculate from the drop-down list, select either current month or next month.

If you want to define different settings for the last period, select the check box next to the Different Period 12 field, select current or next month, and enter numeric values in the fields.
6. Click Save.
Example schedule groups
The Monthly and Quarterly schedule types look the same with monthly automatically setting periods 1-12 and quarterly setting periods 3,6,9 and 12.
The custom schedule type (shown below) is used to create, for example, a yearly schedule or one where tasks should only be created in Periods 6 and 12.
Was this article helpful?
That’s Great!
Thank you for your feedback
Sorry! We couldn't be helpful
Thank you for your feedback
Feedback sent
We appreciate your effort and will try to fix the article